How can you Change The Closing Date Password In QuickBooks?
Want to change the Closing Date Password in QuickBooks? Then this article is just made for you. Follow this comprehensive guide and learn how to Change the Closing Date Password in QuickBooks by just following a few steps. The process can be a little twisted, but we will make sure to provide you with the most effortless steps.
Before going further with the Change in the Closing Date Password in QuickBooks, you first need to understand what is the Closing date itself.
What is the Closing Date?
The Closing Date is a specific date that is shown all over on which books have been closed. A date is considered a Closing Date once they have been judged, entries have been adjusted, and reports have been completed and sent to the investors, lenders, or tax authorities. This closing date is utilized to save the data from any inadvertent modifications on a specific prior to the Closing Date. This is contrary to all the other accounting Systems. Usually, the Accounting Software requires the user to Shut the books first, due to which any kind of modifications in the transactions is impossible.
In contrast to this, QuickBooks Software provides flexibility to its users to restrict access to period users. In simple words, you can easily Re-Open the Books in QuickBooks.
However, you have to understand that setting a Closing Date don't leads to recording of the Transactions. QuickBooks makes a few adjustments on its own.
For example it increases the Retained Earning Account by the amount of the previous year’s net income, on the first day of fiscal year itself.
For making changes in the Closing date:
• Tap on the Accounting menu of the Edit section.
• Thereafter head to the Preferences, and then choose the Company Preferences menu.
• Now, it is easier for you to view the current Closing Date and check if there is any, as mentioned below.
• Hit on the Set Date/ Password section and look for the Set Closing Date and Password Window.
• You can do the same in other ways as well. One such way is mentioned below:
• Click on the Company, and hit on the Closing Date.
• Now from the menu choice, you will reach the Window to modify the setting.
• Moreover, the user also has the option to hit on the Company.
• Thereon, head to the Set Up Users and Passwords.
• Next, click on Setup Users.
• Click on the menu selection by clicking on the Closing Date option, as shown in the screenshot.
How Can You Change the Closing Date Password in QuickBooks?
Now, let us understand the steps to Change a Closing Date and Password in QuickBooks Desktop for Windows.
1. Launch QuickBooks at first, and sign in as an Admin.
2. Thereafter head to the Company and choose the Set Closing Date option.
3. Now, provide both your closing Date and Closing Date Password.
4. Lastly, hit Ok, and you are done.
Note: In case you have voided a check that is dated before the closing date using an expense account, you might see the given prompt on your screen.
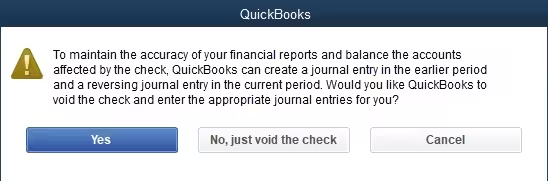
5. Tap on Yes for QuickBooks to generate 2 journal entries. This will balance the accounts affected by the check.
How to Change Closing Date Password in QuickBooks Desktop for Mac Device?
If you are using the QuickBooks software on a Mac device, you can check out the instructions given below:
1. Open Company, and choose Users and Passwords.
2. Thereon, choose the Set Closing Date button.
3. Write down a Closing Date and Closing Date Password and select ok.
How to Change the Closing Date Password in QuickBooks Online?
Check this section of the blog to make changes in the Closing Date Password in QuickBooks Online.
1. Open QuickBooks Online, and Select the Settings tab.
2. Thereafter head to the Company Settings, and tap on the Advanced option.
3. Now from the Accounting section, choose the Edit option, and change the Closing Date.
4. Thereon, you have to enter the new Closing Date, and if you want to modify the password, hit on the new Closing Date Password.
5. Now, post the Confirmation of the password by hitting the Save button.
6. Lastly, select the Done tab.
Conclusive Note!
We positively hope that now you will easily change the closing date in QuickBooks. In case of any discrepancy, feel free to contact our QuickBooks expert by emailing your Queries at info@bizbooksadvice.com.
These experts are highly experienced, with many years of experience in resolving QuickBooks issues. So feel free to contact.

Comments
Post a Comment